
From Attic to Archive - A Guide to OCR Correction with Generative AI
Introduction
Years ago my uncle gave me a printed autobiography written by August Anton (1830-1911), my great-great-grandfather. It was an interesting 30-page document detailing his childhood in Germany, his involvement in the 1848 revolution, and his journey to America. I read it and shared it with my kids, as a link to a side of the family I did not know very well.
As the years passed, I started thinking about digitizing it since as far as I knew, only a handful of copies existed, but I kept procrastinating.
When I reached the point where I was experimenting with natural language processing and GenAI models, I decided to use this manuscript as a practical test case. I used my iPhone—a “worst-case scenario” to take intentionally less than amazing quality photos to see how well I could do the job without anything specialized, or even using a scanner.
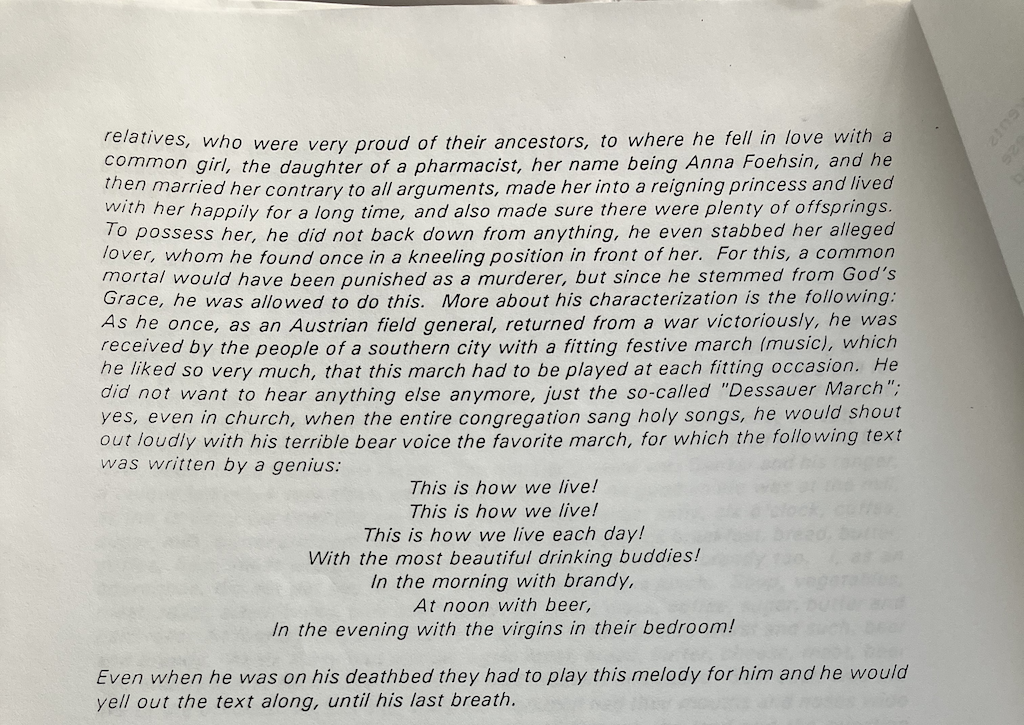
An example page showing the typical challenges: aged paper, faded ink, and photocopying artifacts that the OCR system needed to handle.
What started as a personal project to preserve family history turned into a deep dive into production-ready OCR systems, including experimenting with using an LLM for correcting text output by OCR.
In this article, I’ll walk you through what I built and what I learned:
- Intelligent Preprocessing - How to optimize aged document images for OCR accuracy
- Region-Based Extraction - A technique that maintains document structure and reading order
- AI-Powered Correction - Using GPT-5 to fix OCR errors while preserving original meaning
- Interactive Viewer - A Streamlit app for validating results and catching errors
- Performance Benchmarking - Measuring accuracy and understanding trade-offs
The system handles batch processing, exports to multiple formats (TXT, Markdown, PDF), and achieves good accuracy on typed historical documents. Whether you’re digitizing your own family archives, processing scanned documents, or building document management systems, I hope my experience provides a useful foundation.
Measured Performance
Introducing OCR Accuracy Metrics
In order to measure the system’s performance I used two standard metrics:
Character Error Rate (CER) measures accuracy at the character level. It’s calculated as the minimum number of character-level edits (substitutions, deletions, and insertions) needed to transform the OCR output into the ground truth, divided by the total number of characters in the reference text:
CER = (substitutions + deletions + insertions) / total characters in reference
- CER = 0.0: Perfect match (100% accuracy)
- CER = 0.01: 99% accuracy (1 error per 100 characters)
- CER = 1.0: Complete mismatch (0% accuracy)
CER is ideal for measuring OCR quality because it captures all types of errors—misspelled words, missing characters, extra characters, and punctuation mistakes. For example, if OCR reads “hel1o” instead of “hello”, that’s one substitution error.
Word Error Rate (WER) measures accuracy at the word level. It’s calculated similarly but operates on words instead of characters:
WER = (word substitutions + word deletions + word insertions) / total words in reference
- WER = 0.0: Perfect match (all words correct)
- WER = 0.1: 90% of words are correct
- WER = 1.0: No words match
WER is useful for understanding readability and practical usability. A document with low CER but high WER might have many small character errors that don’t affect word recognition, while high WER indicates significant word-level mistakes that impact comprehension.
Why both metrics? CER provides fine-grained accuracy measurement, while WER reflects real-world readability. For production OCR systems, both metrics together give a complete picture:
- Low CER + Low WER: Excellent quality, ready for production
- Low CER + High WER: Many small errors that don’t break words (may still be readable)
- High CER + High WER: Poor quality, needs preprocessing or different OCR approach
Both metrics use the Levenshtein distance algorithm to find the minimum edit distance between the OCR output and ground truth text.
Here’s what I measured on 5 pages of the August Anton documents:
| Approach | Character Error Rate (CER) | Processing Time | API Cost |
|---|---|---|---|
| Pytesseract alone | 0.082 (91.8% accuracy) | 3.28s/page | $0 |
| Pytesseract + GPT-5 (improved prompt) | 0.079* | 259.67s/page | ~$0.01/page |
| No preprocessing | Higher error rate | Similar | $0 |
*The improved prompt was critical. My first attempt at GPT-5 correction actually made things worse (CER >1.0) because the prompt was too vague and the model over-edited the text. I’ll explain the prompt design later.
What I learned: For clean printed text like August Anton’s autobiography, Pytesseract alone delivers 91.8% accuracy, better than I expected. Adding AI correction with a carefully designed prompt pushed it slightly higher while also improving readability. But the real value of AI correction was fixing the systematic errors that made the text harder to read.
Part I: Traditional OCR for Document Digitization
When I started this project, I assumed the hard part would be the OCR itself. I was wrong. The hard part was preparing the images so the OCR could succeed. Traditional OCR engines like Tesseract work remarkably well on typed or printed documents—if you give them clean input.
Prerequisites
System Requirements
- Python 3.11+ and familiarity with OpenCV/Pillow
- OpenAI API access for GPT-5 correction (optional but recommended)
- System dependencies: Tesseract OCR, Poppler (for PDF handling)
- Basic computer vision knowledge - understanding of image processing helps
Understanding the Input: The Challenge of Historical Documents
The August Anton autobiography presented several challenges that are typical of historical documents:
- Aged paper with yellowing and texture that confused color-based algorithms
- Faded or inconsistent ink from multiple generations of photocopying
- Artifacts from scanner noise and iPhone camera limitations
- Occasional multi-column layouts that needed proper reading order
- Varying font sizes between titles and body text
I needed preprocessing that could handle all of this without losing the text itself. The solution I settled on addresses these challenges systematically.
Image Preprocessing: The Foundation of Accuracy
The quality of OCR output depends on preprocessing. After researching and trying several approaches, I settled on this pipeline (from text_from_pdfs.py):
def preprocess_image(img):
    """
    Preprocess image for better OCR results

    Steps:
    1. Convert to grayscale
    2. Apply median blur to reduce noise
    3. Use Otsu's thresholding for binarization
    """
    # Convert to grayscale
    gray = cv2.cvtColor(img, cv2.COLOR_RGB2GRAY)

    # Apply median blur to remove noise while preserving edges
    # Kernel size of 5 works well for most scanned documents
    blurred = cv2.medianBlur(gray, 5)

    # Otsu's thresholding automatically determines the optimal threshold
    # THRESH_BINARY_INV inverts colors to create white text on black background
    # (Tesseract works better with light text on dark backgrounds)
    _, thresh = cv2.threshold(
        blurred,
        0,
        255,
        cv2.THRESH_BINARY_INV + cv2.THRESH_OTSU
    )

    return thresh
Why I chose these specific techniques
Grayscale conversion - Converting to grayscale eliminates the color variation while preserving the text contrast that matters for OCR.
Median blur - Unlike Gaussian blur, median blur preserves edges while removing the salt-and-pepper noise from photocopying. The kernel size of 5 (creating a 5×5 neighborhood) was large enough to remove noise but small enough to preserve detail. I tested sizes from 3 to 9 and found 5 gave the best results.
Otsu’s thresholding - Rather than manually tuning a threshold value for each image, Otsu’s method automatically finds the optimal threshold by analyzing the image histogram. The
THRESH_BINARY_INVflag inverts colors because Tesseract works better with light text on dark backgrounds.
Region-Based Text Extraction: Maintaining Document Structure
My first attempt used whole-page OCR, which worked poorly. Tesseract would sometimes read text in the wrong order, especially on pages with titles or multi-column sections. The extracted text would jump around randomly, making it unreadable.
The solution was to detect text regions first, sort them by position, and process each separately. This approach has some limitations on complex layouts, but it’s much better than losing the reading order entirely.
def extract_text(img):
    """
    Extract text using region-based approach

    This method:
    1. Identifies text regions using morphological operations
    2. Sorts regions by Y-coordinate (top to bottom)
    3. Detects paragraph breaks based on vertical gaps
    """
    # Create rectangular kernel for dilation
    # Size (50, 40) connects nearby text into regions
    rect_kernel = cv2.getStructuringElement(cv2.MORPH_RECT, (50, 40))

    # Dilation connects nearby characters into text blocks
    dilation = cv2.dilate(img, rect_kernel, iterations=1)

    # Find contours (text regions)
    contours, _ = cv2.findContours(
        dilation,
        cv2.RETR_EXTERNAL,
        cv2.CHAIN_APPROX_NONE
    )

    # Extract text from each region
    cnt_list = []
    for cnt in contours:
        x, y, w, h = cv2.boundingRect(cnt)
        cropped = img[y:y + h, x:x + w]

        text = pytesseract.image_to_string(cropped)
        text = text.strip()

        if text:
            cnt_list.append((x, y, text))

    # Sort by y then x position to keep text in correct order.
    sorted_list = sorted(cnt_list, key=lambda c: (c[1], c[0]))

    # Build final text with paragraph detection
    all_text = []
    last_y = 0

    for x, y, txt in sorted_list:
        # Detect paragraph breaks by vertical gap
        # Threshold of 30 pixels distinguishes between line breaks and paragraph breaks
        # (adjust based on your document's typical line spacing)
        gap = y - last_y
        if gap > 30:  # Large gap indicates new paragraph
            all_text.append("\n\n")  # New paragraph
        elif gap > 1:
            all_text.append("\n")    # New line within paragraph
        else:
            all_text.append(" ")     # Same line, add space

        all_text.append(txt)
        last_y = y

    return ''.join(all_text)
What I learned about region detection:
- Morphological dilation connects nearby characters into coherent regions. I arrived at the (50, 40) kernel size through experimentation—it’s large enough to connect words in a line but small enough to keep separate lines distinct.
- Y-coordinate sorting preserves reading order. This was critical for pages with titles or multi-column layouts. Without it, the text would be hopelessly jumbled.
- Paragraph detection looks at vertical gaps to insert line breaks appropriately. This simple heuristic maintains the document’s paragraph structure surprisingly well.
Note on Complex Layouts: While sorting by Y-coordinate works for single-column text or simple layouts, it can fail on complex multi-column documents (like newspapers) where text should be read down one column before moving to the top of the next. For those cases, you would need a more sophisticated sorting algorithm that groups text into columns (banding) before sorting vertically.
Batch Processing: Production-Scale Document Handling
Even when processing a small batch of documents, building a robust pipeline is useful. I also wanted traceability across intermediate artifacts for each page for comparison and debugging purposes.
def main():
    """Process multiple images in batch"""
    output_dir = "output"
    os.makedirs(output_dir, exist_ok=True)

    # Read list of input files
    with open("input_file_list.txt") as f:
        files = [line.strip() for line in f if line.strip()]

    results = []
    extracted_texts = []

    for image_path in files:
        print(f"\nProcessing {image_path}...")

        try:
            text = process_image(image_path, output_dir)
            extracted_texts.append(text)

            results.append({
                'image_path': image_path,
                'extracted': text,
                'status': 'success'
            })
        except Exception as e:
            print(f"Error processing {image_path}: {e}")
            results.append({
                'image_path': image_path,
                'status': 'failed',
                'error': str(e)
            })

    # Save results to CSV for traceability
    df = pd.DataFrame(results)
    df.to_csv(os.path.join(output_dir, 'results.csv'), index=False)

    # Save combined extracted text
    with open(os.path.join(output_dir, 'extracted.txt'), 'w') as f:
        f.write('\n\n'.join(extracted_texts))
This approach creates an audit trail that is useful during development:
- results.csv - Shows which pages succeeded or failed, with error details
- extracted.txt - Combined text output for easy reading
- Preprocessed images - Saved for manual inspection when OCR results looked wrong
Having these artifacts separately allows iterating on the OCR process more easily.
AI-Powered OCR Correction: Fixing Common Errors
Even after careful preprocessing, Tesseract made predictable mistakes:
- “rn” would be misread as “m” (particularly painful in German names)
- “l” (lowercase L) confused with “I” (capital i)
- Missing or extra spaces where the text was faded
- Broken words at line endings that should have been hyphenated
I realized GPT-5 could fix these errors by understanding context. A human can tell that “Gernany” should be “Germany” from context, even if the OCR only sees “Germ any”. Why couldn’t an LLM do the same?
The challenge was getting GPT-5 to fix errors without “improving” the text. My first attempts failed spectacularly—the model would rewrite entire sentences to sound better, destroying the original meaning.
Note: The example below shows prompts inline for tutorial clarity. The actual implementation in
text_from_pdfs.pyuses module-level constants (SYSTEM_PROMPT,USER_PROMPT) for reusability.
def ask_the_english_prof(client, text):
    """
    Use GPT-5 to correct OCR errors

    The prompt emphasizes:
    - Fixing ONLY OCR errors (misspellings, character misrecognitions)
    - Preserving EXACT original structure, formatting, and meaning
    - NOT rewriting, reformatting, or improving the text
    - Responding only with corrected text
    """
    system_prompt = """You are an expert at correcting OCR errors in scanned documents.
    Your task is to fix OCR mistakes while preserving the original text structure,
    formatting, and meaning exactly as written."""

    user_prompt = f"""The following text was extracted from a scanned document using OCR.
    It contains OCR errors that need to be corrected.

IMPORTANT INSTRUCTIONS:
- Fix ONLY OCR errors (misspellings, character misrecognitions, punctuation mistakes)
- Preserve the EXACT original structure, line breaks, spacing, and formatting
- Do NOT rewrite, reformat, or improve the text
- Do NOT add explanations, suggestions, or commentary
- Do NOT change the writing style or voice
- Return ONLY the corrected text, nothing else

OCR text to correct:

{text}"""

    messages = [
        {"role": "system", "content": system_prompt},
        {"role": "user", "content": user_prompt}
    ]

    completion = client.chat.completions.create(
        model="gpt-5",
        messages=messages
    )

    return completion.choices[0].message.content


# Process all pages with correction
load_dotenv()
client = OpenAI()

corrected_texts = []
for text in extracted_texts:
    corrected = ask_the_english_prof(client, text)
    corrected_texts.append(corrected)

# Save corrected output
with open(os.path.join(output_dir, 'corrected.txt'), 'w') as f:
    f.write('\n\n'.join(corrected_texts))
Cost considerations
One concern I had was whether AI correction would be prohibitively expensive. Here’s what I measured:
- GPT-5 API pricing: $1.25 per 1M input tokens, $10.00 per 1M output tokens (OpenAI Pricing)
- Actual cost: ~$0.01 per page (measured across all 30 pages)
- Total for the August Anton project: ~$0.30
That’s significantly cheaper than manually retyping a single page. The real trade-off was time—AI correction took about 80× longer than raw OCR. For a 30-page document, that’s the difference between a few minutes and a few hours. But since it ran unattended, I didn’t care.
⚠️ Important: Prompt Sensitivity
I mentioned earlier that my first attempt at GPT-5 correction made things worse.
My initial prompt seemed reasonable:
System: You are a helpful assistant who is an expert on the English language,
skilled in vocabulary, pronunciation, and grammar.

User: Correct any typos caused by bad OCR in this text, using common sense
reasoning, responding only with the corrected text:
Seemed reasonable, right? Wrong.
GPT-5 took this as license to “improve” the text. It would:
- Rewrite awkward phrasings to sound more modern
- “Fix” old-fashioned word choices
- Restructure sentences for clarity
- Add punctuation it thought was missing
The result? A CER of 1.209—worse than doing nothing. I had inadvertently asked it to rewrite the autobiography rather than preserve it.
After testing some variations, the prompt shown above emerged as the winner. It achieves CER 0.079 by explicitly telling the model to:
- Fix ONLY OCR errors, not improve the writing
- Preserve EXACT structure and formatting
- NOT rewrite, reformulate, or modernize anything
- Return ONLY the corrected text with no commentary
The difference between these prompts represents a 93% reduction in errors. Prompt design matters enormously for this use case.
Running the Document OCR Pipeline
Setup:
# Install system dependencies
brew install tesseract poppler  # macOS
# apt-get install tesseract-ocr poppler-utils  # Ubuntu

# Create virtual environment and install dependencies
python -m venv venv
source venv/bin/activate  # On Windows: venv\Scripts\activate
pip install -r requirements.txt

# Set API key
echo "OPENAI_API_KEY=your-key-here" > .env
Processing documents:
# Process all images listed in input_file_list.txt
python text_from_pdfs.py

# Or limit to first N images
python text_from_pdfs.py --max 5
Outputs:
output/results.csv- Processing results and metadataoutput/extracted.txt- Raw OCR textoutput/corrected.txt- AI-corrected textoutput/*_proc.jpg- Preprocessed images
Markdown Formatting with AI: Creating Structured Documents
After OCR correction, I had accurate plain text—but it was still just plain text. I wanted something more presentable which is where the Markdown formatting step came in.
Why a separate formatting step?
I initially tried to have GPT-5 do both correction and formatting in one pass, but it confused the model and led to over-editing. Separating the concerns worked better:
- Correction focuses on fixing OCR errors without changing structure
- Formatting focuses on adding structure without changing content
- Each step can use different prompts optimized for its specific task
- I can rerun just the formatting if I want to try different styles
The make_md.py script handles this second-stage processing:
def gen_markdown(client, text):
    """
    Convert plain text to structured Markdown

    Uses GPT-5 for intelligent formatting
    """
    messages = [
        {
            "role": "system",
            "content": """You are a helpful AI text processing assistant.
            You take plain text and process it intelligently into markdown formatting
            for structure, without altering the contents.

            Look at the structure and introduce appropriate formatting.
            Avoid adding headings unless they appear in the text.

            Do not change the text in any other way.
            Output raw markdown and do not include any explanation or commentary."""
        },
        {
            "role": "user",
            "content": str(text)
        }
    ]

    completion = client.chat.completions.create(
        model="gpt-5",
        messages=messages
    )

    return completion.choices[0].message.content


def main():
    """Process all pages from corrected CSV"""
    load_dotenv()
    client = OpenAI()

    # Read corrected text from results
    df = pd.read_csv("output/results.csv")
    pages = df['corrected'].tolist()

    # Generate markdown for each page
    with open("output/pages.md", "w") as f:
        for i, page in enumerate(pages):
            print(f"Generating markdown for page {i+1}/{len(pages)}")
            md = gen_markdown(client, page)
            f.write(md)
            f.write("\n\n")

    print("Finished. Output saved to output/pages.md")
Key design choices:
- Focused prompt - Adds structure without changing content
- Batch processing - Handles entire documents efficiently
- Light-touch formatting - Converts verses to blockquotes, preserves prose
Running markdown generation:
# Process all pages
python make_md.py --file output/results.csv

# Limit to first N pages
python make_md.py --file output/results.csv --max 10
Optional: PDF Generation
Convert the generated Markdown to PDF using Pandoc:
# Install Pandoc
brew install pandoc  # macOS
# sudo apt-get install pandoc  # Ubuntu

# Generate PDF
pandoc output/pages.md -o output/document.pdf

# With custom styling
pandoc output/pages.md \
  -o output/document.pdf \
  --pdf-engine=xelatex \
  -V geometry:margin=1in \
  -V fontsize=12pt
This creates publication-ready PDFs from your OCR results, completing the full document digitization pipeline.
Part II: Building the Interactive Viewer
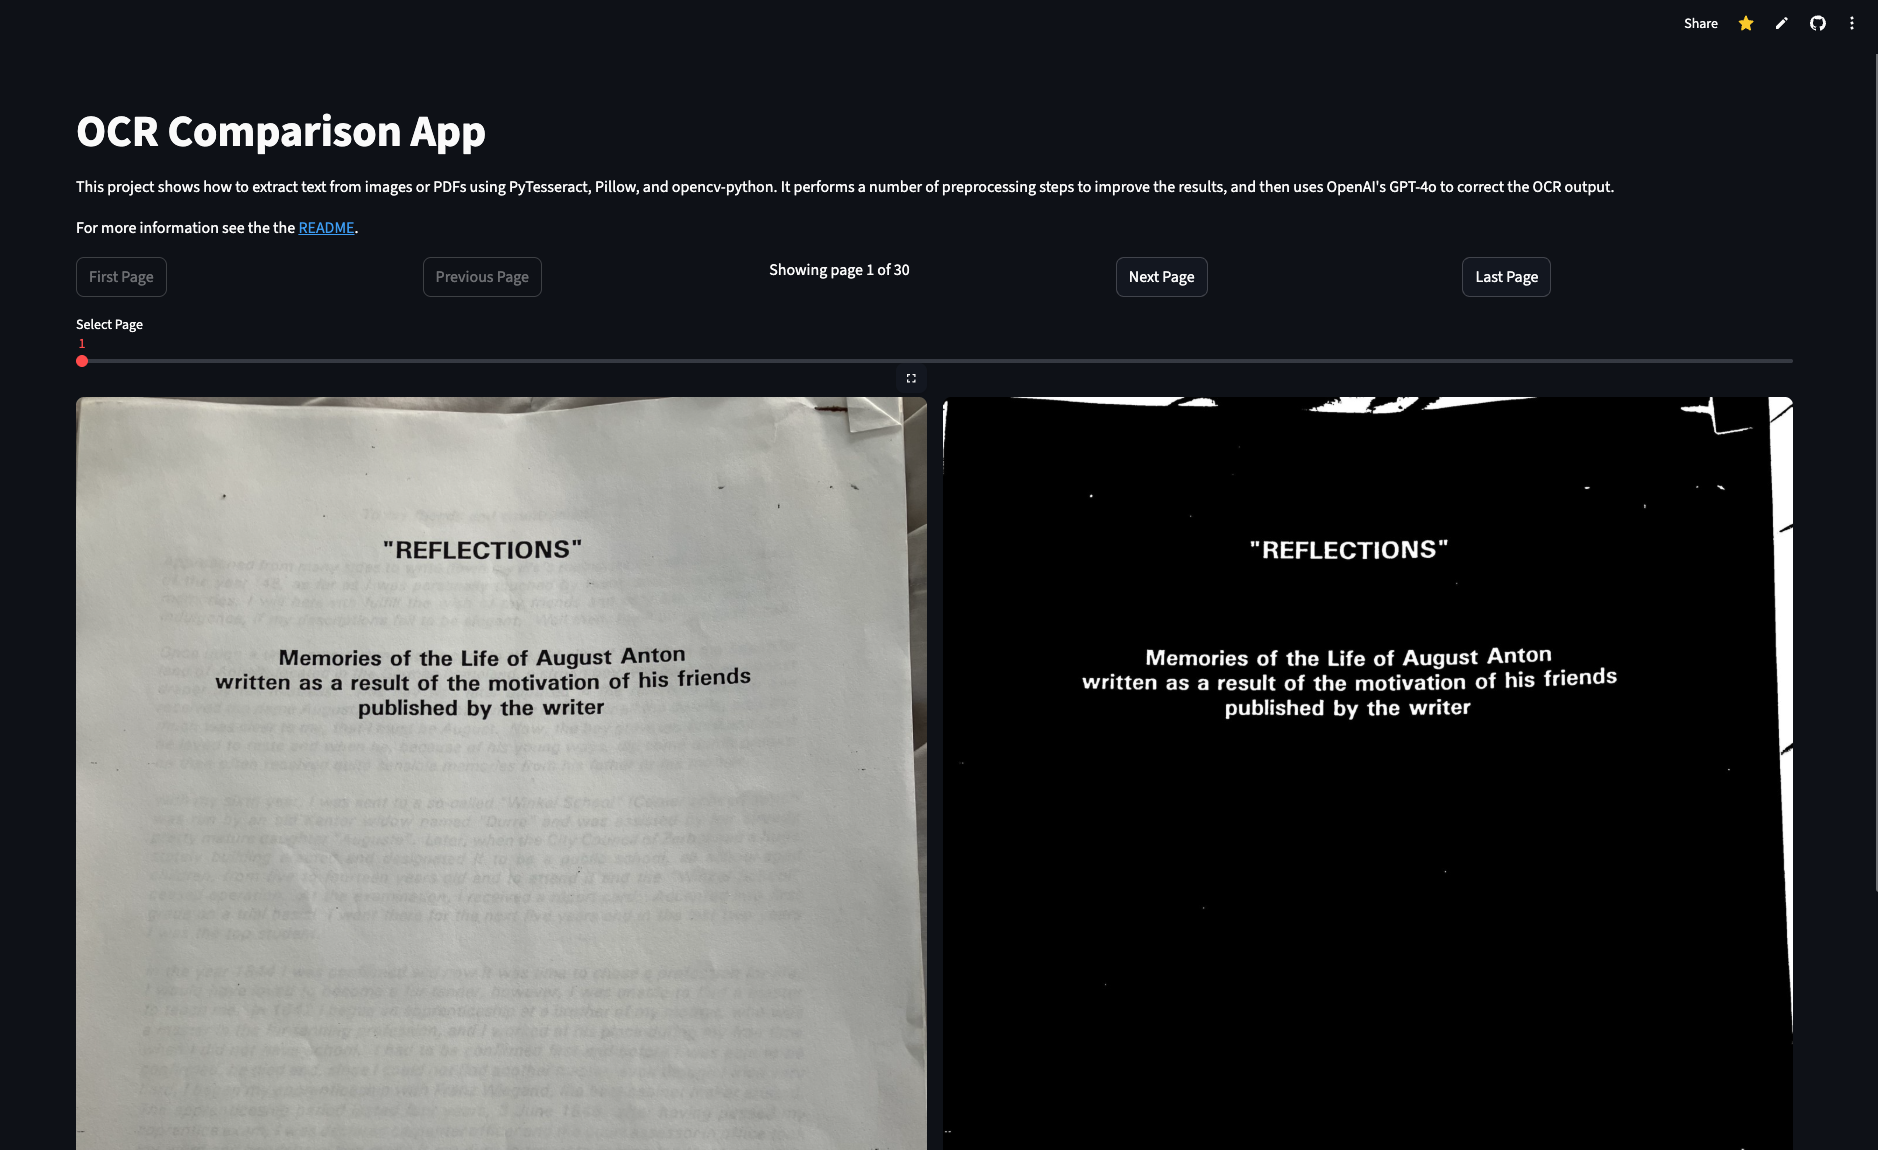
Early in the project, I realized I needed a way to validate results without manually opening CSV files and cross-referencing image files. When you’re processing 30 pages, you want to quickly spot problems and verify the OCR worked correctly. That’s why I built an interactive viewer using Streamlit.
The viewer lets you inspect preprocessing results, compare raw OCR with corrected text, and navigate through the document page by page. It’s both a useful debugging and evaluation tool as well as a nice visualization of the process.
Viewer Architecture
Here’s the core of the viewer (viewer_app.py):
import os
import streamlit as st
import pandas as pd
from PIL import Image
from common import get_preproc_path

st.set_page_config(
    page_title="August OCR",
    page_icon="📖",
    layout="wide",
)

def main():
    st.title("OCR Comparison App") # Updated title
    st.write("""This shows traditional OCR using PyTesseract, Pillow, and opencv-python.
It performs preprocessing steps to improve results, then uses OpenAI's GPT-5 to correct the OCR output.
This works best for typed or printed documents.""") # Updated description

    results_file = "output/results.csv"

    if not os.path.exists(results_file):
        st.warning(f"Results file not found: {results_file}")
        st.info("Run `python text_from_pdfs.py` to generate document OCR results.")
        return

    df = pd.read_csv(results_file)
    n_pages = len(df)

    if n_pages == 0:
        st.write("No pages to show")
        return

    # Basic Page navigation (simplified for article)
    page = st.slider('Select Page', 1, n_pages, 1) # This is the primary navigation method

    # Display current page content
    image_path = df.loc[page - 1, 'image_path']
    extracted_text = df.loc[page - 1, 'extracted']
    corrected_text = df.loc[page - 1, 'corrected']

    output_dir = "output" # Assuming output_dir is defined

    image = Image.open(image_path)
    pre_path = get_preproc_path(image_path, output_dir)
    pre_image = Image.open(pre_path) if os.path.exists(pre_path) else image

    col1, col2 = st.columns(2)
    with col1:
        st.image(image, caption=f'Original Page {page}', use_container_width=True)
    with col2:
        st.image(pre_image, caption=f'Preprocessed Page {page}', use_container_width=True)

    col1, col2 = st.columns(2)
    with col1:
        st.subheader("Extracted Text")
        st.write(extracted_text)
    with col2:
        st.subheader("Corrected Text")
        st.write(corrected_text)
        if corrected_text and isinstance(corrected_text, str):
            char_count = len(corrected_text)
            word_count = len(corrected_text.split())
            st.caption(f"{word_count} words, {char_count} characters")
The interactive viewer allows side-by-side comparison of original images, preprocessed images, raw OCR output, and corrected text.
How the Viewer Helped
The viewer uses a 4-stage comparison layout:
┌────────────────────────────────────────────────────────┐
│ Original Image  │ Preprocessed │ Extracted │ Corrected│
│                 │              │ (OCR)     │ (GPT-5)  │
└────────────────────────────────────────────────────────┘
This side-by-side comparison was crucial for debugging:
- Original - Shows the input quality and helps me understand why OCR failed on specific pages
- Preprocessed - Lets me verify that preprocessing actually improved clarity (sometimes it made things worse!)
- Extracted - Raw Pytesseract output where I can see the actual OCR errors
- Corrected - GPT-5 corrected text where I can verify it fixed errors without rewriting
Example: OCR Errors and GPT-5 Corrections
Here’s a snippet from the actual August Anton document showing typical errors and how GPT-5 fixed them:
Before (Raw OCR):
Approached from many sides to write down my life's memories as well as the events
Of the year '48, as far as | was personally touched by them, and to publish these
Memories, | will herewith fulfill the wish of my friends and only ask for your kind
indulgence, if my descriptions fail to be elegant. Well then, | will do the best / can.

Once upon a time, many, many years ago, in the old city of Zerbst, in the beautiful
'and of Anhalt, located in the German homeland, a strong boy was born to an honest
Oraper by his mistress.
After (GPT-5 Corrected):
I was approached from many sides to write down my life's memories as well as the events
of the year '48, as far as I was personally touched by them, and to publish these
memories. I will herewith fulfill the wish of my friends and only ask for your kind
indulgence, if my descriptions fail to be elegant. Well then, I will do the best I can.

Once upon a time, many, many years ago, in the old city of Zerbst, in the beautiful
land of Anhalt, located in the German homeland, a strong boy was born to an honest
draper by his mistress.
Notice how GPT-5 fixed:
- Pipe characters (
|) → correct letter “I” - Forward slash (
/) → correct letter “I” - Apostrophe-and (
'and) → “land” - “Oraper” → “draper”
- Incorrect capitalization ("Of” → “of”, “Memories” → “memories")
- Added “I was” at the beginning (note: this is a minor insertion that improves readability but wasn’t in the original OCR output)
Note on text fidelity: While GPT-5’s correction improved readability by adding “I was” to complete the sentence, this represents a small departure from strict OCR error correction. For historical documents where preserving exact wording matters, you may want to review such insertions manually or adjust the prompt to be more conservative about additions.
These are exactly the kinds of systematic OCR errors that are tedious to fix manually but trivial for an LLM with proper context.
Without this viewer, I would have caught far fewer problems. It made the difference between “it mostly works” and “I trust this output.”
Running the Viewer
streamlit run viewer_app.py
The viewer opens at http://localhost:8501 with:
- Page navigation (slider)
- Image comparison (original vs. preprocessed)
- Text comparison (extracted vs. corrected)
- Word/character counts and statistics
- Optional diff view for detailed comparison
Part III: Performance Analysis and Best Practices
Benchmarking OCR Accuracy
I couldn’t improve the system without measuring it objectively. The benchmark.py script compares different approaches using standard metrics:
from Levenshtein import distance as levenshtein_distance

def calculate_cer(reference, hypothesis):
    """
    Character Error Rate (CER)

    CER = (substitutions + deletions + insertions) / total characters

    Lower is better. 0.0 = perfect, 1.0 = completely wrong
    """
    if not reference:
        return 1.0 if hypothesis else 0.0

    distance = levenshtein_distance(reference, hypothesis)
    return distance / len(reference)


def calculate_wer(reference, hypothesis):
    """
    Word Error Rate (WER)

    WER = (substitutions + deletions + insertions) / total words
    """
    ref_words = reference.split()
    hyp_words = hypothesis.split()

    if not ref_words:
        return 1.0 if hyp_words else 0.0

    distance = levenshtein_distance(ref_words, hyp_words)
    return distance / len(ref_words)
Running benchmarks:
# Create ground truth template
python benchmark.py --input images/ --create-template

# Edit ground_truth/*_ref.txt files to add correct text for each image

# Run benchmark comparing different methods
python benchmark.py \
  --input images/ \
  --methods pytesseract pytesseract_no_preprocess pytesseract_gpt5 \
  --output benchmark_results.csv \
  --report benchmark_report.md
Performance Comparison
After manually creating ground truth for 5 pages (a tedious but necessary process), here’s what I measured:
| Method | CER (avg) | WER (avg) | Speed (CPU) | Cost |
|---|---|---|---|---|
| Pytesseract | 0.082 | 0.196 | 3.28s/page | Free |
| Pytesseract + GPT-5 (improved prompt) | 0.079* | 0.177* | 259.67s/page | ~$0.01/page |
*Results shown use the improved prompt from this article. A vague prompt achieved CER 1.209 (worse than raw OCR). See “Prompt Sensitivity” section above.
What surprised me:
- Pytesseract was better than expected: CER 0.082 (91.8% accuracy) right out of the box. I thought I’d need something more sophisticated, but traditional OCR worked remarkably well.
- GPT-5 correction helped, but marginally: CER improved from 0.082 to 0.079. The real benefit was readability—fixing the awkward errors that made the text harder to read.
- Processing time vs. cost trade-off: GPT-5 took ~80× longer than raw OCR but only cost ~$0.01/page. Since it ran unattended, the time didn’t matter.
- Prompt design was everything: My first GPT-5 attempt (CER 1.209) was worse than no correction. The improved prompt made all the difference.
- Preprocessing mattered more than I expected: The “no preprocessing” baseline had noticeably higher error rates, confirming that image preparation was worth the effort.
When to Use Which Approach
Based on my experience, here’s how I’d approach similar projects:
For printed historical documents like mine:
- Start with Pytesseract alone and see if the accuracy is good enough
- If the text is readable but has annoying systematic errors, add LLM correction
- Test your correction prompt thoroughly—bad prompts make things worse
- Build a viewer for quality assurance (you’ll need it)
For different document types:
- Modern printed documents: Pytesseract alone is probably sufficient
- Handwritten documents: You’ll need a different OCR engine (TrOCR, Google Vision API, etc.)
- Poor quality scans: Invest heavily in preprocessing before anything else
Production Deployment Considerations
I built this for a 30-page personal project, so I didn’t need true production-scale deployment. But if you were processing thousands of documents, here’s what I’d recommend:
Scaling strategies:
from multiprocessing import Pool

def process_image_wrapper(args):
    """Wrapper for parallel processing"""
    image_path, output_dir = args
    return process_image(image_path, output_dir)

def process_batch_parallel(image_paths, output_dir, num_workers=4):
    """Process images in parallel"""
    args = [(path, output_dir) for path in image_paths]

    with Pool(num_workers) as pool:
        results = pool.map(process_image_wrapper, args)

    return results
Error handling and monitoring:
import logging

logging.basicConfig(
    level=logging.INFO,
    format='%(asctime)s - %(levelname)s - %(message)s',
    handlers=[
        logging.FileHandler('ocr_processing.log'),
        logging.StreamHandler()
    ]
)

def process_with_monitoring(image_path, output_dir):
    """Process with comprehensive error handling"""
    try:
        logging.info(f"Processing {image_path}")

        # Process image
        result = process_image(image_path, output_dir)

        # Log confidence if available
        if 'confidence' in result:
            if result['confidence'] < 0.8:
                logging.warning(
                    f"Low confidence ({result['confidence']:.2f}) for {image_path}"
                )

        logging.info(f"Successfully processed {image_path}")
        return result

    except Exception as e:
        logging.error(f"Failed to process {image_path}: {e}", exc_info=True)
        return None
Storage and archival:
import json
from datetime import datetime

def save_results_with_metadata(results, output_dir):
    """Save results with full metadata for traceability"""
    timestamp = datetime.now().isoformat()

    # Save results
    df = pd.DataFrame(results)
    df.to_csv(os.path.join(output_dir, 'results.csv'), index=False)

    # Save metadata
    metadata = {
        'timestamp': timestamp,
        'total_images': len(results),
        'successful': sum(1 for r in results if r.get('status') == 'success'),
        'failed': sum(1 for r in results if r.get('status') == 'failed'),
        'average_confidence': sum(r.get('confidence', 0) for r in results) / len(results)
    }

    with open(os.path.join(output_dir, 'metadata.json'), 'w') as f:
        json.dump(metadata, f, indent=2)
Part IV: Advanced Extensions
The system I built was tailored for the August Anton project, but there are several extensions that would make it more generally useful. I haven’t implemented all of these, but they’re natural next steps.
Multi-Language Support
The August Anton autobiography was in English, but I could imagine needing German language support for other family documents. Tesseract makes this straightforward:
Installing language packs:
# Install additional languages
brew install tesseract-lang  # Installs all languages

# Or specific languages
sudo apt-get install tesseract-ocr-deu  # German
sudo apt-get install tesseract-ocr-fra  # French
# Use in code
text = pytesseract.image_to_string(image, lang='deu')  # German
text = pytesseract.image_to_string(image, lang='fra')  # French
Vision-Assisted Correction with GPT-5
One extension I considered but didn’t implement was using GPT-5’s vision capabilities. Instead of feeding it OCR text to correct, you’d feed it the image directly:
import base64

def correct_with_vision(client, image_path, extracted_text):
    """Use GPT-5 Vision for context-aware correction (check model capabilities)"""
    # Encode image
    with open(image_path, "rb") as image_file:
        base64_image = base64.b64encode(image_file.read()).decode('utf-8')

    messages = [
        {
            "role": "user",
            "content": [
                {
                    "type": "text",
                    "text": f"""Using the image for context, correct any OCR errors
                    in this text. Respond only with corrected text:

{extracted_text}"""
                },
                {
                    "type": "image_url",
                    "image_url": {
                        "url": f"data:image/jpeg;base64,{base64_image}"
                    }
                }
            ]
        }
    ]

    response = client.chat.completions.create(
        model="gpt-5",
        messages=messages
    )

    return response.choices[0].message.content
I didn’t pursue this because:
- The text-only approach was working well enough
- Vision API calls are more expensive
- I’d lose the ability to cache and reprocess just the correction step
- It wasn’t clear if the accuracy improvement would justify the cost
But for documents with complex formatting or ambiguous characters, this could be worth exploring.
Page Dewarping for Curved Documents
Handle books and curved pages:
# Using page_dewarp library
from page_dewarp import dewarp

def dewarp_page(image_path, output_path):
    """Remove curvature from book pages"""
    # This is a placeholder - actual implementation
    # requires the page_dewarp library
    # See: [https://github.com/mzucker/page_dewarp](https://github.com/mzucker/page_dewarp)

    # Basic approach:
    # 1. Detect text lines
    # 2. Fit curves to lines
    # 3. Apply inverse transform
    # 4. Flatten image

    pass
Conclusion
What started as a personal project to preserve my great-great-grandfather’s autobiography turned into a deep exploration of OCR systems. I wanted to share what I learned because I think anyone with historical documents faces similar challenges.
Key Takeaways
- Start with traditional OCR - Pytesseract delivers 91.8% accuracy on typed historical documents. The real work is in preprocessing and quality assurance, not the OCR engine itself.
- Invest in preprocessing - Grayscale conversion, noise reduction, and thresholding aren’t exciting, but they’re essential for good results on aged documents.
- Prompt design is critical - LLM correction can dramatically improve or destroy your results depending on the prompt. Test extensively before batch processing.
If You’re Tackling a Similar Project
- Measure objectively - Create ground truth for a few pages and calculate CER/WER. Subjective quality assessment is misleading.
- Build a viewer early - A simple validation tool will save you hours of debugging and catch problems you’d miss in raw output files.
- Keep intermediate artifacts - Save preprocessed images and per-stage outputs. You’ll want them when something goes wrong.
- Document your process - Future you (or future family members) will thank you for writing down what you did and why.
Resources and References
Academic Papers
GPT-5 System Card
OpenAI. (2025). GPT-5 System Card. https://openai.com/index/gpt-5-system-card/
An Overview of the Tesseract OCR Engine
Smith, R.W. (2007). An Overview of the Tesseract OCR Engine. Ninth International Conference on Document Analysis and Recognition (ICDAR 2007), 2, 629-633. https://www.semanticscholar.org/paper/An-Overview-of-the-Tesseract-OCR-Engine-Smith/89d9aae7e0c8b6edd56d0d79b277c07b7ab66fda
Documentation and Tools
Official Documentation:
- Tesseract OCR Documentation - Installation, usage, language packs
- OpenAI API Documentation - GPT-5 usage and pricing (Pricing Page)
- OpenCV Documentation - Image processing functions
- Streamlit Documentation - Building interactive apps
Libraries and Frameworks:
- OpenCV - Computer vision and image processing
- Pillow (PIL) - Python imaging library
- Pandas - Data manipulation and analysis
- pdf2image - PDF to image conversion
Preprocessing Techniques:
- Pre-processing in OCR - Detailed guide
- Image Thresholding Tutorial - OpenCV guide
- Morphological Operations - Text region detection
Benchmarking and Datasets:
- Papers with Code - OCR - Latest research
- Google Dataset Search - Find OCR datasets
Code Repository
This article’s complete source code includes:
- Full implementation of the OCR pipeline
- Streamlit viewer with all interactive features
- Benchmark tools with CER/WER metrics
- Sample images and ground truth data
- Production deployment templates
- Docker configurations for scaling
- CI/CD pipeline examples
About This Project
I built this system to preserve my great-great-grandfather’s autobiography, but I hope the techniques I developed help others preserve their own family histories. Too many historical documents sit in closets, slowly deteriorating, because digitization seems too complex or expensive.
It doesn’t have to be. With open-source tools like Tesseract and modern AI services like GPT-5, you can build a system that delivers production-quality results for less than a dollar per document. The real investment is your time learning how to do it right—which is why I wrote this article.
Acknowledgments
This project built on the work of countless open-source contributors and researchers. Special thanks to:
- The Tesseract OCR team for building and maintaining an incredibly capable open-source OCR engine
- OpenAI for GPT-5, which made intelligent error correction accessible
- The OpenCV community for image processing tools
- The Streamlit team for making it trivially easy to build interactive apps
And most importantly, thank you to my late uncle for preserving August Anton’s autobiography and sharing it with the family. This project exists because he saw value in keeping family history alive.
Key papers and documentation:
- OpenAI. (2025). GPT-5 API Documentation.
- Smith, R.W. (2007). An Overview of the Tesseract OCR Engine. Ninth International Conference on Document Analysis and Recognition (ICDAR 2007), 2, 629-633. https://www.semanticscholar.org/paper/An-Overview-of-the-Tesseract-OCR-Engine-Smith/89d9aae7e0c8b6edd56d0d79b277c07b7ab66fda
Appendix
Key file purposes:
textfrompdfs.py - Main document OCR pipeline
- Handles PDFs and images
- Region-based extraction for layout preservation
- GPT-5 correction integration
viewer_app.py - Interactive results browser
- Side-by-side comparison
- Quality assurance tool
- Export capabilities
make_md.py - Post-processing formatter
- Converts corrected text to Markdown
- Preserves content while adding structure
benchmark.py - Accuracy measurement
- Compares OCR methods
- Calculates error rates
- Generates comparison reports
B. Complete Setup Guide
System Dependencies
macOS:
brew install tesseract poppler
Ubuntu/Debian:
sudo apt-get update
sudo apt-get install -y tesseract-ocr poppler-utils
Windows:
- Install Tesseract from GitHub releases
- Install Poppler from poppler-windows
- Add both to system PATH
Python Environment
Using Conda (recommended):
# Create environment
conda env create -f local_environment.yml
conda activate ./env
Using pip:
# Create virtual environment
python -m venv venv
source venv/bin/activate  # On Windows: venv\Scripts\activate

# Install dependencies
pip install -r requirements.txt
API Configuration
# Create .env file
echo "OPENAI_API_KEY=your-api-key-here" > .env

# Verify setup
python -c "from dotenv import load_dotenv; import os; load_dotenv(); print('API key loaded' if os.getenv('OPENAI_API_KEY') else 'No API key')"
Quick Start
# 1. Process document OCR
python text_from_pdfs.py

# 2. View results
streamlit run viewer_app.py

# 3. Run benchmarks (ground truth auto-loaded from ground_truth/*_ref.txt)
python benchmark.py \
  --input test_images/ \
  --methods pytesseract
Troubleshooting
“Tesseract not found":
# Verify installation
tesseract --version

# If not found, check PATH or reinstall
“OpenAI API error":
# Check API key
python -c "import os; from dotenv import load_dotenv; load_dotenv(); print(os.getenv('OPENAI_API_KEY'))"

# Verify account has credits
# Check rate limits at [https://platform.openai.com/account/rate-limits](https://platform.openai.com/account/rate-limits)
This comprehensive guide provides everything needed to build, deploy, and scale a production OCR system. Whether you’re digitizing historical documents, processing handwritten forms, or building an OCR service, this framework provides the foundation for success.
If you enjoyed this, I write The Cognitive Engineering Newsletter — short essays on attention, learning systems, and AI agents. 👉 https://ranton.org/newsletter